Wednesday, August 10, 2016

Why Don't I Look Like the Girls on Instagram?


I talk to women all the time about makeup, it’s my favorite thing to do. I love helping people find products and techniques that work for them and help them enhance their natural beauty. It takes time to find exactly what works for each person, but it also takes being realistic. In today's world of advertising and Instagram, it's hard to have a realistic view of makeup. While makeup can make a drastic difference in your appearance, it isn't going to magically change who you are. 

When I put on lipstick I'd like it to look like Kylie Jenner's Lips, but it doesn’t. When I apply foundation I don't magically have perfectly tanned, untextured, unfreckled skin. It can be frustrating to see "insta famous" men and women constantly looking flawless and not having your makeup turn out the same, trust me I know. (My skin is super flawless in the dark) 

Next time you're feeling discouraged that your makeup doesn't look as "flawless" as it does on Instagram, remember there is a reason why: 

Editing 
I have nothing against editing pictures (although a lot of people go overboard so be careful). I edit mine if I need a pimple covered up! Most people you see on Instagram edit their photos, they blur edges, soften skin, enhance colors, whiten teeth, etc. While these women you're looking at are probably extremely talented with makeup, they also know how to edit any imperfections out. They have pores in person, I promise. 

Products 
They're using higher end products! A $65 foundation looks different and wears differently than a $12 foundation. Same goes for eyeshadows, blushes, bronzers, etc. This is sometimes true, not always. Yes, drugstore makeup is amazing and can look amazing with a good technique, but high-end skincare and makeup can make your skin look better, has more pigmentation, and lasts better throughout the day.

Amount of product used 
This took awhile for me to wrap my head around. The amount of blush you wear on a normal day isn't enough color to pop on camera (probably), Makeup for film tends to be more heavy handed than makeup we wear every day. Remember when you see a stunning image, it may look very different in real life.

Lighting  & Camera 
This is a big one if you're unhappy with how your makeup looks in pictures. A front camera iPhone selfie is not going to look as crisp as one taken with a professional camera and lighting. Try doing your makeup in natural light by a window to see what a difference it makes on your ability to see how products really look on your skin. It will shock you what doing your makeup on your bathroom Vs. in natural light shows you. When you do your makeup in good lighting it's easier to see if a product doesn't work with your skin.

Cosmetic Surgery/Facial Features
Cosmetic Surgery is a personal decision, who am I to judge anyone on what they do to their body? That being said, I never ever questioned how my lips looked with lipstick on them until this lip filler craze hit. Now when I see a video of someone with fillers applying a lipstick I think how my lips don't look like that. I have big lips, I don't need fillers, but they give lips this crease-less look that makes lipstick look amazing. Some people have naturally chiseled cheekbones, or big almond eyes, etc. Everyone looks different, whether it's natural or not, which we must remember when applying makeup. What looks flawless on someone may not look flawless on us.

Practice 
This may be the biggest one of all... The first time you apply lipstick, eyeliner, eyeshadow, etc., it is not going to be perfect. It takes time to develop a technique that works for you. Many of the women you see all over your Instagram feed have made a career with makeup and have practiced for countless hours to perfect their crisp wing.

So grab your makeup bag, sit in front of natural light and practice, practice, practice.

Remember, it's just makeup. If you don't like it, wash it off and start again.

Thursday, July 21, 2016

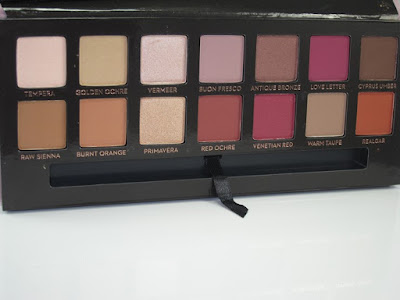
Anastasia Beverly Hills Modern Renaissance Palette Tutorial (LONG POST)

A step by step guide to this eye look minus the lashes:


I like to start with my eyes so I can clean up any fallout under my eyes!


Shades in the Order I use them!
Tempera (1)
Buon Fresco (2)
Burnt Orange (3) 
Raw Sienna (4) 
Red Ochre (5)
Vermeer (6) 
Buon Fresco (7)
Burnt Orange (8)


Pro airbrush Concealer 57 used for base
778 was Shadow Tempera (1)
Pro Blending Brush (27) I used for Shadows 2-4 and to blend  Small Real Techniques for Shadow Red Ochre (5) Elf "C" brush was used for Vermeer (6) Morphe M143 was used with 7 & 8 Under eye


I start with Mac Soft Ochre Paint Pot.
This helps my eyeshadow to pop and
last all day.


I set the paint pot with
shadow 1, Tempera.
I start every eye look
with a primer and a shadow
similar to my skin tone.


Place Shadow 2, Buon Fresco  
in Crease. If you have
hooded eyes start 
slightly above crease.
Continue blending and adding
more pigment until you're satisfied
with how it looks.


Take shadow 3 Burnt orange and
blend into the outer V creating a
slight wing shape with your shadow


I used Raw Sienna 4 to deepen the color
and blended in toward the lid


Then place shadow 5 Red Ochre
at the bottom of the lower V
and blend to create a gradient 


My favorite way to make
shimmer shadows pop
is to spray Fix+ on the brush
after putting the shadow
on the brush. Then patting
the brush onto my lid, not
swipe.


Using Fix + and Vermeer
I placed this on my lid in a patting motion


Add your favorite mascara!


Final eye look


This is great starting eye look for everyday! :)


Remember, it's just makeup. If you don't like it, wash it off and start again. 


Tuesday, July 19, 2016

Foundation 101: Primer


If you've ever painted a wall you may have used a paint primer to help your paint color adhere to the wall better and make it look as nice as possible for a long period of time. Face primer is the same thing, a layer between your skin and foundation to help it apply smoothly and last longer while filling any fine lines or pores. Some people don't use primers, which is fine. If you have a problem you're looking to fix with makeup, a primer that targets your issue is probably a good investment!

Primer should be placed as a thin layer all over or where you need it. 
Be careful to only use a small amount to have maximum benefits. 


Water Based Primers - Lighter weight product that preps most skin types by hydrating and adding glow.

Silicone Based Primers - Great for sensitive skin and allergic skin by creating a barrier between the skin and the foundation which helps prevent clogged pores and breakouts.

                 ** Silicone based Primers should ONLY be used with Silicone based Foundations**
                            
But Haley, how do I know if it is silicone based? 


    Great Question! Most primers will have Water as the first ingredient but if Cone/-methicone, and/or -siloxane is seen in the first few ingredients, it is probably Silicone based. 
By mixing a silicone based primer with a water based foundation the products can start to "pill"
Think of Silicone & Water like Oil & Water.
They Don't Mix! 

Below are Different Types of Primers
(both silicone & water based)

NYX Pore Filler $14


Pore Filling Primers - These primers tend to be heavier and work better when used sparingly. Use pore filling primers around your nose and cheeks where your pores may be larger and a different primer around the rest of your face. Use a tapping motion to push this into your pores to create a flawless look.


Hydrating - Dry or Normal skin types benefit from a hydrating primer that sinks into and nourishes the skin. These TEND to be water based, some contain oil so check ingredients if acne prone! Rub this all over your face or apply with a brush!
Becca Ever Matte Poreless Priming Perfector $38


Mattifying - This is an oily girls new BFF. Seriously mattifying primers can be intense. Use a little at a time because if you over do it the primer will begin to clump up, but gentle rub this into your T-Zone, Chin, or wherever you produce oil and it will help your foundation last all day with less touch ups!


Smoothing - Almost always Silicone based. Smoothing primers help by making fine lines and textured skin "disappear" or almost disappear. Really can help create a flawless look!


Color Correcting- These add a sheer color to help with any pigmentation issues you may have
  • Green/Yellow Cancels Red
  • Purple/Pink/Peach Helps Dullness and Adds Radiance  
Makeup Forever Colored Primers $37

Revlon PhotoReady Color Correcting Primer

$12.99


Illuminating - Great for that summer time glow thats so popular right now! Illuminating primers add a light shimmer or hydrated glow to the skin.

              L'Oreal Paris Magic Lumi Primer $11


Remember, it's just makeup. If you don't like it, wash it off and start again. 

Thursday, June 30, 2016

Blush, Contour, & Highlight: The Basic Idea

In this post you'll see some less than attractive pictures of me badly photoshopped to explain the basic idea of blush, contour, and highlight... ENJOY!


Contour Oval
First off, What is contouring? 
Contouring uses shading to create a specific shape and enhance features with makeup, but it isn't one size fits all. 
If you've googled "how to contour" I am sure you've seen the hundreds of videos slapping on cream product all over the face and then blending it into a "perfect contour" but I want to break it down a little more. 

The "ideal" face shape is Oval which is an easy way to look at contouring your own face. 

Imagine your facial features in an oval (as seen in that flattering picture to the right) and anything not in that oval is a general guide to where to contour. Once you've visualized your oval place your contour brush on the edge of your face and blend your contour color inward toward your facial features. Everyones will be slightly different depending on their face shape but it gives a more defined look to their face. 

This works as a base to contouring, you can leave it as is or add more depending. Some may chisel their cheek bones to create the illusion of higher cheek bones. Others may shade under their bottom lip to make them look plumper. Currently nose contouring is popular, which is like a wash off nose job. 


Put it all together and what do you get?
Color Key:
Yellow = Highlight
Pink = Blush
Orangey Brown = Bronzer
Darker Brown = Contour
A full face... duh. 
There is not a "Right Way" to apply blush, bronzer, highlight, etc but there are ways that tend to be more flattering than others. 

On the right is a picture of the  basic application of each face product. 

The highlight in this case it NOT a shimmer highlight but a brighter concealer or foundation to add dimension and work with the contour to create a chiseled affect. You can add a shimmer or glowing highlight to all of these areas to create a glow.

The blush placement is where I like to place blush because it helps creating a lifting look to the face, but it can be placed more on the apples of the cheek if wanted, which can add a youthful touch. I do recommend that mature faces keep away from blushing the apples of their cheeks because it can drag your face down and age you.

Bronzer isn't used to contour, but more of a way to warm up your face and create a healthy sun kissed glow without the damage to your skin. 
Most days in the summer I wear
Bronzer, Blush, and Highlight on
my cheeks only and bronze my forehead
 slightly.


Now do you need all of this?
Short Answer... No. Not at all. As time goes on you find what you like your face to look at. I suggest taking this as a guide to where to place each product and blend it to make it look like natural contours of your face. Personally I do not really contour my nose, but I do bathe myself in highlighter and blush. 


QUICK TIP: Always place your brush on the spot of your face where you want the most color. This applies to face products and eyeshadow, then blend from the that spot to defuse the color


Remember, it's just makeup. If you don't like it, wash it off and start again. 

Tuesday, June 7, 2016

Makeup Brushes: What do I really need?


If you wanted to sit down and do a full face of makeup with a brush for each step you'd have:
  1. Primer Brush (Most people use their fingers though) 
  2. Foundation Brush/Sponge 
  3. Concealer Brush (Or Same Sponge ^^) 
  4. Powder Brush (Or Puff or Sponge)
  5. Contour Brush
  6. Bronzer Brush 
  7. Blush Brush 
  8. Highlight Brush 
  9. Possibly a Blending Brush (I use my powder brush) 
PLUS any eye/lip brushes you'd use... but that'll be another post. 

That seems a little crazy, especially if you're just getting into makeup, so what do you really need to get started? 

1. Beauty Sponge if using liquid/cream foundations
Beautylish
I really suggest investing in a makeup sponge, like a Real Techniques Sponge ($5-$11) or Beauty Blender ($20). A sponge is great because you can use it for foundation, concealer, powder, cream blush, cream contour, cream highlight... are you noticing a trend? Beauty sponges can be used damp or dry and can be used in a multitude of ways. I use this for 90% of liquid or cream foundation application and 100% of concealer application. Over time you may try different brushes for foundation application, but to begin this is a great and easy way to apply foundation. 

OR


2. A Buffing Brush if using powder foundations
This Real Techniques Core Collection ($18) has my favorite buffing and contour brush ever. It also has a pointed foundation brush and concealer brush that are also great brushes to have. A buffing brush is important when using powder because it allows you to work the product into your skin and look as natural as possible.


And that's really all you NEED to create a flawless base, the rest is really optional although recommended so your face has color and dimension. Some people (like me...) wear as much as they can fit on their face, others only like blush or bronzer. It takes time and a little experimenting to decide what you like.

Here is a list of 5 types of brushes with affordable options to begin experimenting!

1. Powder Brush/Puff - If you're oily a good powder brush for touch ups is key
         ELF Selfie Ready Powder Brush $6
         Real Techniques Powder Brush $10 - I'd buy 100 of these just to cuddle while I sleep it's so good(I also use this for bronzer) 
2. Blush Brush 
          ELF Blush Brush $3
          Real Techniques Blush Brush $9
3. Contour Brush
          ELF Contour Brush $6
          Morphe M141 $4.99
4. Bronzer Brush
         ELF Complexion Brush $4
       Morphe Bronzer Brushes $5-$18
5. Highlight Brush 
          ELF Highlighting Brush $3
          Morphe M310 $4.99

As you play around with different products and looks you'll slowly collect brushes that work best for how you like to apply your makeup, but these are great brushes to begin with!


Remember, it's just makeup. If you don't like it, wash it off and start again. 

Wednesday, May 25, 2016

8 Makeup Products That Help Your Makeup Last All Day

Most people need their makeup to last morning to night without looking sloppy, worn off, or greasy. Take a look at these 8 products that will help you create a flawless face that lasts all day!


Base - a product you apply before another product which allows the product on top to stick. Most pigments need a base to stick on to (this could refer to foundation) 
NYX Eyeshadow Base comes in different colors, which will transform the shadows or pigments you are using.

Primer - Primer preps the skin, by hydrating or filling pores etc., so foundation goes onto the skin smoother and lasts longer. You can also buy primers for eyes, which do the same thing with eyeshadows. The picture to the left shows what types of different primers are available.
NYX Primers are affordable and easy to get at Ulta, Target, and some drugstores.


Setting Spray - Setting Sprays are used to mesh the makeup on your face into one clean layer. It merges foundation, concealer and powder into one layer. Setting Spray will contain NO or VERY LITTLE alcohol 
Mac Fix + is a popular setting spray and something I always have on hand

Finishing Spray/Fixing Spray - A finishing spray literally finishes makeup by adding a barrier between the rest of the world and your made up face. This is your last step to make sure your makeup stays flawless all day! 
Popular Finishing Sprays 

Setting Powder -
Setting Powder literally sets foundation and concealer to prevent it from creasing or moving around on the face. Most people need to set any cream/liquid products with a powder. It also can be used throughout the day to "touch up" and reduce shine/oil. 
L'oreal True Match Powder is my go to setting powder
Rimmel Stay Matte Pressed Powder is great for people with oily skin


Finishing Powder -
As the name implies, and what we know about finishing spray, this finishes our makeup (before any spray) and helps to reduce lines and pores which gives the look of smoother skin.
Makeup Forever HD Microfinish Powder
NYX Studio Finishing Powder


Matte - Any product that has no shine and if it is a liquid it dries flat. Eyeshadows, Foundation, Blushes, Bronzers, Lipsticks can all be matte. Matte products tend to be oil free and last the longest on the skin or lips.


Pigment - pure color, sometimes matte but can also have shimmer or glitter. Pigments tend to be loose. Most pigments need a type of sticky base to adhere to but once in place give a lot of color payoff with not a ton of product. 


Remember, it's just makeup. If you don't like it, wash it off and start again. 


Thursday, May 12, 2016

Foundation 101: Formula

One of the most amazing and frustrating things about makeup right now is the hundreds and hundreds of options available. Walking through Sephora, Ulta, or any drugstore gives more choices than we know what to do with!  Foundation, also known as cover-up or base, is a staple in creating flawless skin but can easily go south if the shade, finish, or formulation that is used doesn’t mesh with our skin!

Foundation is used to even out skin and create a smooth skin texture. Our goal with using foundation is to make our skin look better with it than without it, but it is not always clear how we accomplish that! This post will explain some of the more popular formulas and who each formula is best for!

Liquid
Liquid foundations are definitely the most popular formula, with products available in almost every price range with a magnitude of finishes and shades. A liquid foundation can be found for almost any skin type. It can be applied with a brush, sponge, or fingers. 
    
Oily: Look for oil free with a Matte Finish.

Combination: This can be a bit tricky depending on each persons needs, but try oil-free lighter foundation in the summer when it is warmer and you're more likely to sweat. In the winter try a more hydrating formula as there is less moisture in the air, which dries out our skin


Dry: Luminous finishes are great for dry skin because they are less likely to stick to any dry patches on your skin.

Normal: Any finish can work on normal skin types. It really depends on what you prefer! 


Cream (or Stick)
Cream Foundations tend to be extremely full coverage and will last all day. Cream has become increasingly popular again and variations can even be found in the drugstore. Like liquid you can find creams made for people of all skin types. 

Powder
Powder foundations are great for on-the-go application and for oily skin! Powder foundation can look extremely natural when buffed into the skin with a brush!

Tinted Moisturizer/BB Cream/ CC/ DD/ Probably ZZ
Tinted moisturizers are marketed under numerous names, but they all do basically the same thing. Some may be better for super dry skin, or better for blemish prone skin but they are all a light coverage for a very natural look.  I really like tinted moisturizers on days where I want to look put together without a lot of effort. Also, tinted moisturizers are great for people who are just starting to wear makeup because it blends in easily and normally feels very light on your skin! 

My Favorite Everyday Foundations-  

Personally I wear liquid foundations most days because it's easiest for me, but use powder on vacation and cream/stick foundation when I go out at night. 


Current Favorite: Clinique Beyond Perfecting in Shade .05 Breeze (Yes I am the lightest shade... I don't go out much) This is a full coverage heavy duty foundation that leaves the skin flawless. I have pretty normal skin, but this would also be great for oily skin. It may work on dry skin if you hydrate before application. At $27 it is a great mid-range foundation. 


Drugstore Favorite:  L'oreal True Match in Shade N1 (Did I mention I'm pale?) A liquid foundation with buildable coverage without feeling too heavy on the skin makes this perfect for just about anyone. If you have dry skin check out the Lumi True Match, another favorite of mine for that luminous look!  (Normally $7-$11)


High End Favorite: Givenchy Photo'Perfexion in Shade 4 Perfect Vanilla  (I actually only like this because I'm not the lightest shade). This is a lot like True Match, but blends easier and lasts longer.  This sells for $51 at Sephora. 


Remember, it's just makeup. If you don't like it, wash it off and start again.